
Ukiyo-e & Scrolls
Woodblock Printing Tools: A Guide to Japanese Mokuhanga
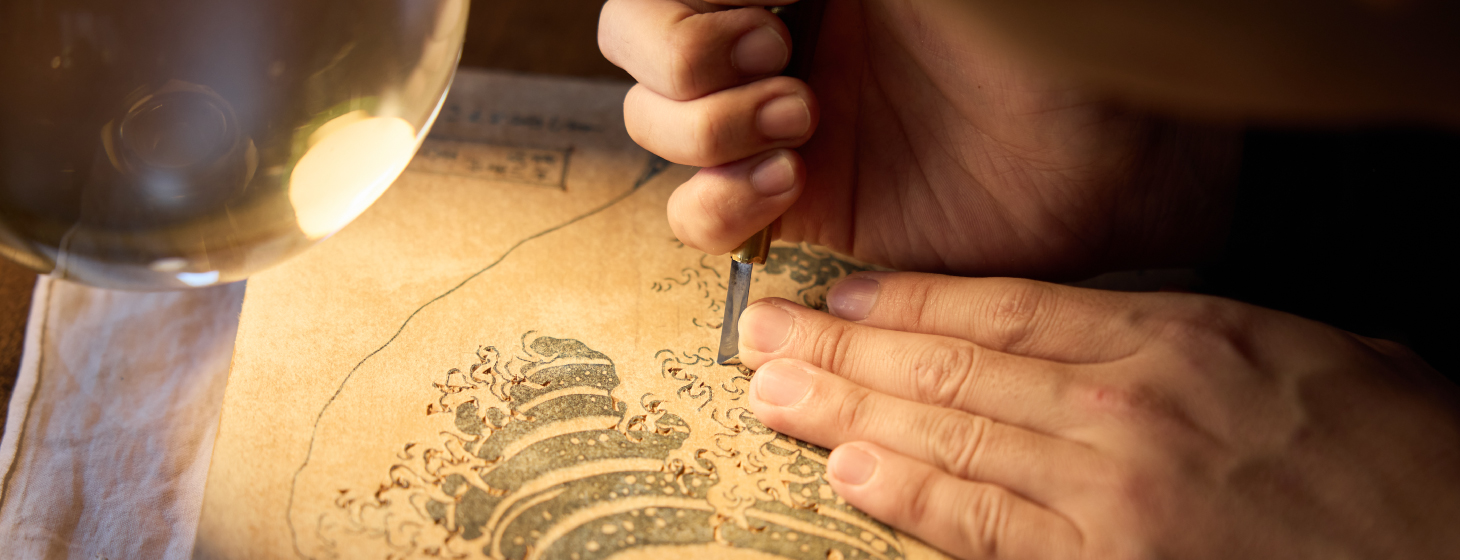
- What Is Mokuhanga? The Japanese Woodblock Printing Tradition
- Mokuhanga Tools at a Glance
- Japanese Woodblock Carving Tools: The Hori-shi's Kit
- The Woodblock: Choosing the Printing Surface
- The Kento: The Registration System That Makes Color Printing Possible
- Woodblock Printing Tools: The Baren and Hake Brushes
- Woodblock Printing Supplies: Washi, Pigment and Nori
- What Woodblock Printing Tools Reveal About the Prints You Collect
- Discover Nihonga for Contemporary Spaces
Woodblock printing tools in the Japanese tradition, known as mokuhanga (木版画, “wood-plate picture”), fall into four groups: the wooden block (hangi, 版木); carving tools, led by the single-bevel knife (hangito, 版刀) and a set of gouges and chisels; printing tools, namely the baren (馬連) pressing pad and the hake (刷毛) brushes; and the washi paper, water-based pigment and rice paste that the tools work with. The notches called kento (見当) that hold the paper in place are cut into each block and make color printing possible.
This guide names each tool, says what it does and how to choose it, and explains why mokuhanga looks the way it does. It is written for beginners buying a first set, for readers who want to understand how ukiyo-e were made, and for collectors who want to read a print’s line, gradation and registration. Materials such as paper and pigment are covered here only briefly; our guide to Japanese woodblock printing supplies goes into them in depth.
What Is Mokuhanga? The Japanese Woodblock Printing Tradition
Mokuhanga (木版画) is the Japanese woodblock printing tradition: the water-based relief process that produced the ukiyo-e prints of the Edo period (1603–1868) and that professional artists around the world still practice. It differs from Western woodcut in two main ways. It uses water-based pigment instead of oil-based ink, and it presses the paper onto the block by hand with a baren instead of using a press. The result is color that is transparent, layered and luminous, and a surface that carries the faint marks of the baren.
A full-color nishiki-e (錦絵, “brocade picture”) needed three specialists. The eshi (絵師, picture master) designed the composition and drew the key-block design. The hori-shi (彫師, carver) cut the design into a series of wooden blocks, one for each color. The suri-shi (摺師, printer) transferred each color to the paper with the baren and brushes. The tools below belong to these three stages.
Mokuhanga Tools at a Glance
The table lists the main Japanese woodblock tools in the order they are used, with what each does and what to look for when choosing one. Details follow in the sections after it.
| Tool | Stage | What it does | Choosing one |
|---|---|---|---|
| Woodblock, hangi (版木) | Carving | The relief surface that is carved and printed from | Cherry for fine detail; plywood is a practical choice for learning |
| Single-bevel knife, hangito (版刀) | Carving | Cuts both sides of each outline | One mid-width knife to start; add fine and broad ones later |
| Round gouge, marunomi (丸鑿) | Carving | Clears background wood | A small and a medium size cover most work |
| Flat chisel, hiranomi (平鑿) | Carving | Levels broad flat areas | One wide chisel is enough for most blocks |
| V-gouge, sankakuto (三角刀) | Carving | Fine parallel lines, hair, texture | A fine V-gouge; useful once the basics are secure |
| Trimming knife, kiridashi (切り出し刀) | Carving | Tight corners, small repairs | A small, sharp one |
| Whetstones, toishi (砥石) | Maintenance | Keep every blade razor sharp | Medium and fine stones; a coarse stone only for repairing chipped edges |
| Baren (馬連) | Printing | Presses the paper onto the inked block | Traditional bamboo-sheath baren, or a ball-bearing or plastic baren for beginners |
| Hake brush (刷毛) | Printing | Spreads pigment and paste over the block | One wide brush for broad areas, a narrow one for small ones |
| Water brush, mizu-bake (水刷毛) | Printing | Dampens the block for bokashi gradation | Softer and finer than the pigment brush |
| Kento notches (見当) | Printing | Position the paper identically on every block | Cut into the block, not bought |
| Washi, pigment and nori (和紙・顔料・糊) | Printing | The paper, color and paste the tools work with | See our supplies guide |

Source: THE SCHRECK HOUSE(https://schreck-house.com/workshops/mokuhanga/)
Japanese Woodblock Carving Tools: The Hori-shi’s Kit
The hori-shi translated the artist’s design into the relief surface that would be printed. The kit is small, but each tool is kept sharp enough to cut both the finest single-hair line and broad cleared grounds.
The Hangito: The Carver’s Main Knife
The hangito (版刀, block knife) is the main carving tool and the one through which the key-block design is first cut. Its blade is sharpened on one face only, with a flat back, and is set in a wooden or bamboo handle. This single-bevel shape gives a clean, precisely angled cut.
Each outline is cut twice. One cut is angled in from one side of the line and a second from the other side, so that a small V-shaped sliver of wood is lifted out and the raised line stands with sloping, supported sides that resist chipping in printing. Holding that angle and pressure through thousands of cuts is the basic measure of carving skill.
Hangito come in several widths, from very fine blades under a millimeter wide for delicate detail to broader blades for bold outlines and curves. A professional keeps a set and picks the width for each passage.
Gouges and Chisels for Clearing the Block
Gouges and chisels remove the wood that should not print: the background, the spaces between design elements and the wide zones of flat-color blocks. The carving tools of the first table are described below in more detail.
| Tool Name (Japanese) | English Description | Primary Function |
|---|---|---|
| 版刀 (hangito) | Single-bevel carving knife | Cuts along both sides of design lines; primary outline carving |
| 丸鑿 (marunomi) | Round gouge (multiple sizes) | Removes background wood; hollows between design elements |
| 平鑿 (hiranomi) | Flat chisel | Clears broad flat areas; levels the background between carved zones |
| 三角刀 (sankakuto) | V-gouge / triangular tool | Produces fine parallel lines, hair and fur textures, geometric patterns |
| 切り出し刀 (kiridashi) | Pointed trimming knife | Fine detail work, tight corners, repair of small carving errors |
The marunomi are the workhorses of background removal. They are pushed by hand for controlled passages or struck with a small mallet (kizuchi, 木槌) for heavier clearing, and they come in a range of sweeps from shallow to deep and in many widths. The sankakuto cuts fine V-shaped channels, useful for the parallel lines that suggest hair, fabric weave and wood grain. In the most demanding ukiyo-e, such as the detailed bijin-ga of Kitagawa Utamaro with their elaborate hairstyles and patterned kimono, this is the tool that realized the finest passages.
Sharpening: Why Whetstones Are Part of the Kit
Carving tools must be sharper than most woodworkers would call sharp. A blade that has lost even a little of its edge crushes and tears the wood fibers beside a line instead of slicing them, leaving a fuzzy edge that shows in the print. The traditional routine moves through Japanese whetstones (toishi, 砥石) from coarse (arato, 荒砥) to medium (nakato, 中砥) to fine finishing stones (shiageto, 仕上砥), followed by stropping on leather. Sharpening is treated as a discipline as demanding as carving, so a beginner should budget for stones and learn to use them from the start.
Choosing Carving Tools
- Start small. One hangito of middle width, a small and a medium round gouge and a flat chisel will carve most first projects. Add a fine V-gouge and a trimming knife as the work demands them.
- Match the tool to the block. Soft plywood forgives a beginner’s angle; cherry rewards a very sharp edge and punishes a dull one.
- Buy tools that can be sharpened. Single-bevel steel that takes a fine edge matters more than a long list of tools.
- Handle and grip. The handle should sit comfortably in the palm for pushing cuts, and a gouge intended for the mallet should have a handle made for striking.
The Woodblock: Choosing the Printing Surface
The woodblock (hangi, 版木) is the foundation of the system. The choice of wood decides what the carver can achieve and how long the block lasts in production.
Why Cherrywood Became the Standard
Japanese mountain cherry (yamazakura, 山桜, Prunus jamasakura) became the preferred wood for ukiyo-e blocks. It is dense, even and fine-grained, so it holds the edges of delicate lines without splitting or crumbling. It is hard enough to survive many printings, yet soft enough to cut cleanly with sharp hand tools. Printing blocks are cut as side-grain planks (itame, 板目), unlike the end-grain blocks of Western wood engraving, and the parallel grain helps the carver predict how the wood will cut along and across the grain.
Other woods have specific roles. Magnolia (hoo, 朴, Magnolia obovata) is softer than cherry and less suited to very fine detail. Boxwood (tsuge, 黄楊) is very hard and close-grained, but it is available only in small pieces, so it is typically used as an end-grain inlay for the finest lines or as a repair plug. Contemporary printmakers also use plywood and other engineered boards, which are cheaper and more stable and are a sensible choice for learning. For the fine carving of great historical ukiyo-e, cherry remains the standard.
Block Thickness and Care
Blocks were planed smooth before reaching the carver. Because the printer applies water-based pigment to the block throughout a session, a block that is thick enough, and well seasoned, resists warping better than a thin one. Ready-made modern blocks are commonly sold in thicknesses of roughly 6 to 13 millimeters; plywood is often 6 to 9 millimeters.
The Key Block and Color Blocks
A set for one nishiki-e has a key block (omo-han or shuhan, 主版) carrying the outline in black, plus one block for each additional color. A simple design might need three or four blocks; an elaborate one with gradations, mica printing (kira-e, 雲母絵) or blind embossing (karazuri, 空摺) could need ten or more.
The key block is carved first. Proofs (kyogo, 校合) printed from it in black on thin washi are pasted face down onto the color blocks as guides, so that every color block aligns with the outline.
The Kento: The Registration System That Makes Color Printing Possible
What made polychrome nishiki-e possible was less a new pigment or tool than a precise registration system, the kento (見当). It is a pair of notches cut into every block in a set: an L-shaped notch (the kagi kento, 鉤見当) in one corner, and a straight notch (the hikitsuke kento, 引き付け見当) along one side. The corner notch fixes two edges of the paper at once, and the side notch prevents rotation. With these two reference points the printer places every sheet in the same position on every block.
The hori-shi cuts the kento into the key block first and transfers it to each color block. An error on any one block shows as a blurred edge or a color that spills past or stops short of its boundary. In the finest historical prints the registration is so exact that the color blocks meet the key-block outlines with no visible gap, achieved by hand with no mechanical stops.
Woodblock Printing Tools: The Baren and Hake Brushes
The suri-shi’s toolkit turns the carved block into a printed image. It centers on the brushes that apply pigment and the baren that transfers it.
The Baren: Japan’s Most Distinctive Printing Tool
The baren (馬連) is a flat, round pad rubbed over the back of the paper to transfer pigment from block to sheet. It is the tool most identified with mokuhanga, and the printer’s pressure, the direction and speed of the strokes and the gradation work are as individual as any part of the carving or design.
A traditional baren has a core (shin, 芯) of tightly wound twisted bamboo cord, shaped into a firm, slightly convex disc. The core is wrapped in a cover (kawa, 皮) of dried bamboo sheath, the covering of the young moso bamboo (孟宗竹, Phyllostachys edulis), twisted at the back into a handle. The slightly ridged face leaves a faint embossed pattern of circular strokes on the back of the washi, one of the physical signatures of a hand-printed sheet that distinguishes it from a photomechanical reproduction.
Baren are made with cores and covers of different fineness. Coarser cores suit strong, flat colors that need firm pressure, while finer ones suit delicate passages and gentle, even pressure. The bamboo cover wears with use and has to be replaced from time to time. Modern alternatives, including plastic or synthetic-pad baren and ball-bearing baren with steel balls that rotate under pressure, are widely sold. They need no bamboo cover and are practical for beginners, though they print slightly differently from the traditional tool.
Hake Brushes and the Application of Pigment
The printing brush is a hake (刷毛), a wide, flat brush of animal hair, traditionally horse or deer hair, set in a thin, flat wooden handle. It distributes the pigment-and-paste mixture evenly across the block in a single sweep, which a round calligraphy brush could not do without streaking. These are not the brushes used in sumi-e and shodo.
A wide hake of 30 millimeters or more covers broad color areas; a narrow one serves small sections. A separate water brush (mizu-bake, 水刷毛), softer and finer, applies clean water to the block before or beside the pigment, which controls how much the color spreads into the paper.
Together the two brushes create bokashi (暈し), the smooth gradation from saturated color to bare paper. The printer lays pigment on one part of the block, wets the adjacent area with the water brush and presses both through the baren. The result depends on the amount of water, the speed of the baren work and the moisture of the paper, all managed by feel.
Choosing Printing Tools
- Baren: a ball-bearing or plastic baren is easy to maintain and forgiving; a bamboo-sheath baren gives more control and a more traditional result but needs care.
- Hake: choose a brush whose hairs are soft and evenly cut, and keep one wide and one narrow. Hair is traditionally prepared before use so that it holds pigment evenly.
- Match size to block: a baren somewhat smaller than the block area it must cover lets you press precisely; a very large one is hard to control on a small block.
Woodblock Printing Supplies: Washi, Pigment and Nori
Three materials complete the toolkit, and each is as consequential as any physical tool. This section is a summary; our guide to Japanese woodblock printing supplies covers them in detail, including what to buy.
- Washi (和紙): traditional printing papers such as hosho (奉書紙), made from kozo (paper mulberry) fibers, are absorbent enough to take water-based pigment and strong enough to survive repeated handling. The paper is dampened before printing, because dry washi repels the pigment and gives thin, uneven impressions.
- Pigment: traditional mokuhanga pigments are water-based, made from mineral colors, plant-derived colors and, later in the Edo period, imported synthetic colors. The best-known is Prussian blue (berorin-ai, ベロリン藍), imported from the West and in use in ukiyo-e from the late 1820s. It gave print artists a strong blue and was used in prints such as Katsushika Hokusai’s “The Great Wave”.
- Nori (糊): a starch paste mixed with the pigment on the block. It acts as binder and thickener: too little and the pigment will not transfer evenly, too much and it dries tacky and opaque.
What Woodblock Printing Tools Reveal About the Prints You Collect
The tools shaped the look of ukiyo-e, and knowing them lets a collector read a print as a record of its making. The bold black outline comes from the hangito’s two-cut technique and the relief logic of the key block. The transparent, layered color comes from water-based pigment pressed through the baren in thin layers. The soft sky gradations in the landscapes of Utagawa Hiroshige exist only because the printer could wet the block beside the pigment and press both together. Kento registration let printers layer ten or more colors in alignment, as in the mica-ground bijin-ga of Kitagawa Utamaro, where a layer of powdered mica in paste was printed before the figure was overprinted.
When examining a print, look at four things.
- Line sharpness. In an early impression the carved lines are crisp and clean. As a block is used, the fine edges wear and printed lines gradually soften, so the finest passages, such as individual hair lines or a wave crest, show the condition of the carving.
- Bokashi gradation. A smooth, continuous gradation without banding or streaking shows good coordination of water brush, pigment brush and baren. Banding suggests the printer worked too slowly; streaks suggest uneven brush work.
- The baren trace. On the back of the sheet, held at an angle to raking light, a subtle embossed pattern of circular or spiral strokes is a physical sign of a hand-printed impression. Photographic facsimiles lack it.
- Registration. Check that key-block outlines meet the color fills at the edges of color areas. Precise registration points to an early impression or a skilled printer; color halos and doubled edges suggest wear, replaced blocks or later printing.
Color also tells a story. Beni (紅), the safflower pink-red, is among the least lightfast of the traditional colors. Warm passages in many historical prints that have had much light exposure have faded to pale tan or vanished, and a print with intact beni is correspondingly valued.
Every quality that distinguishes the finest impressions, whether line precision, color luminosity, atmospheric gradation or mica shimmer, comes from the system of tools described here, used by craftspeople in a collaborative tradition that lasted two centuries. A collector who understands the tools understands the works at a deeper level.
Discover Nihonga for Contemporary Spaces
Shop carefully selected Nihonga,
curated by experienced Japanese art dealers
for homes and commercial spaces worldwide.